Website Builder
Build a professional, branded agency website in minutes - your live listings, lead capture, themes and pages, with no code.
What the Website Builder is
The Website Builder lets you create a professional, branded website for your agency in minutes, with no code and no designer. Your site comes with a free address (for example your-agency.estate-agency.co), pulls your live listings straight from the MLS into a built-in property search - imported automatically and updated in real time - and sends every enquiry directly into your CRM. When you are ready, you can connect your own custom domain.
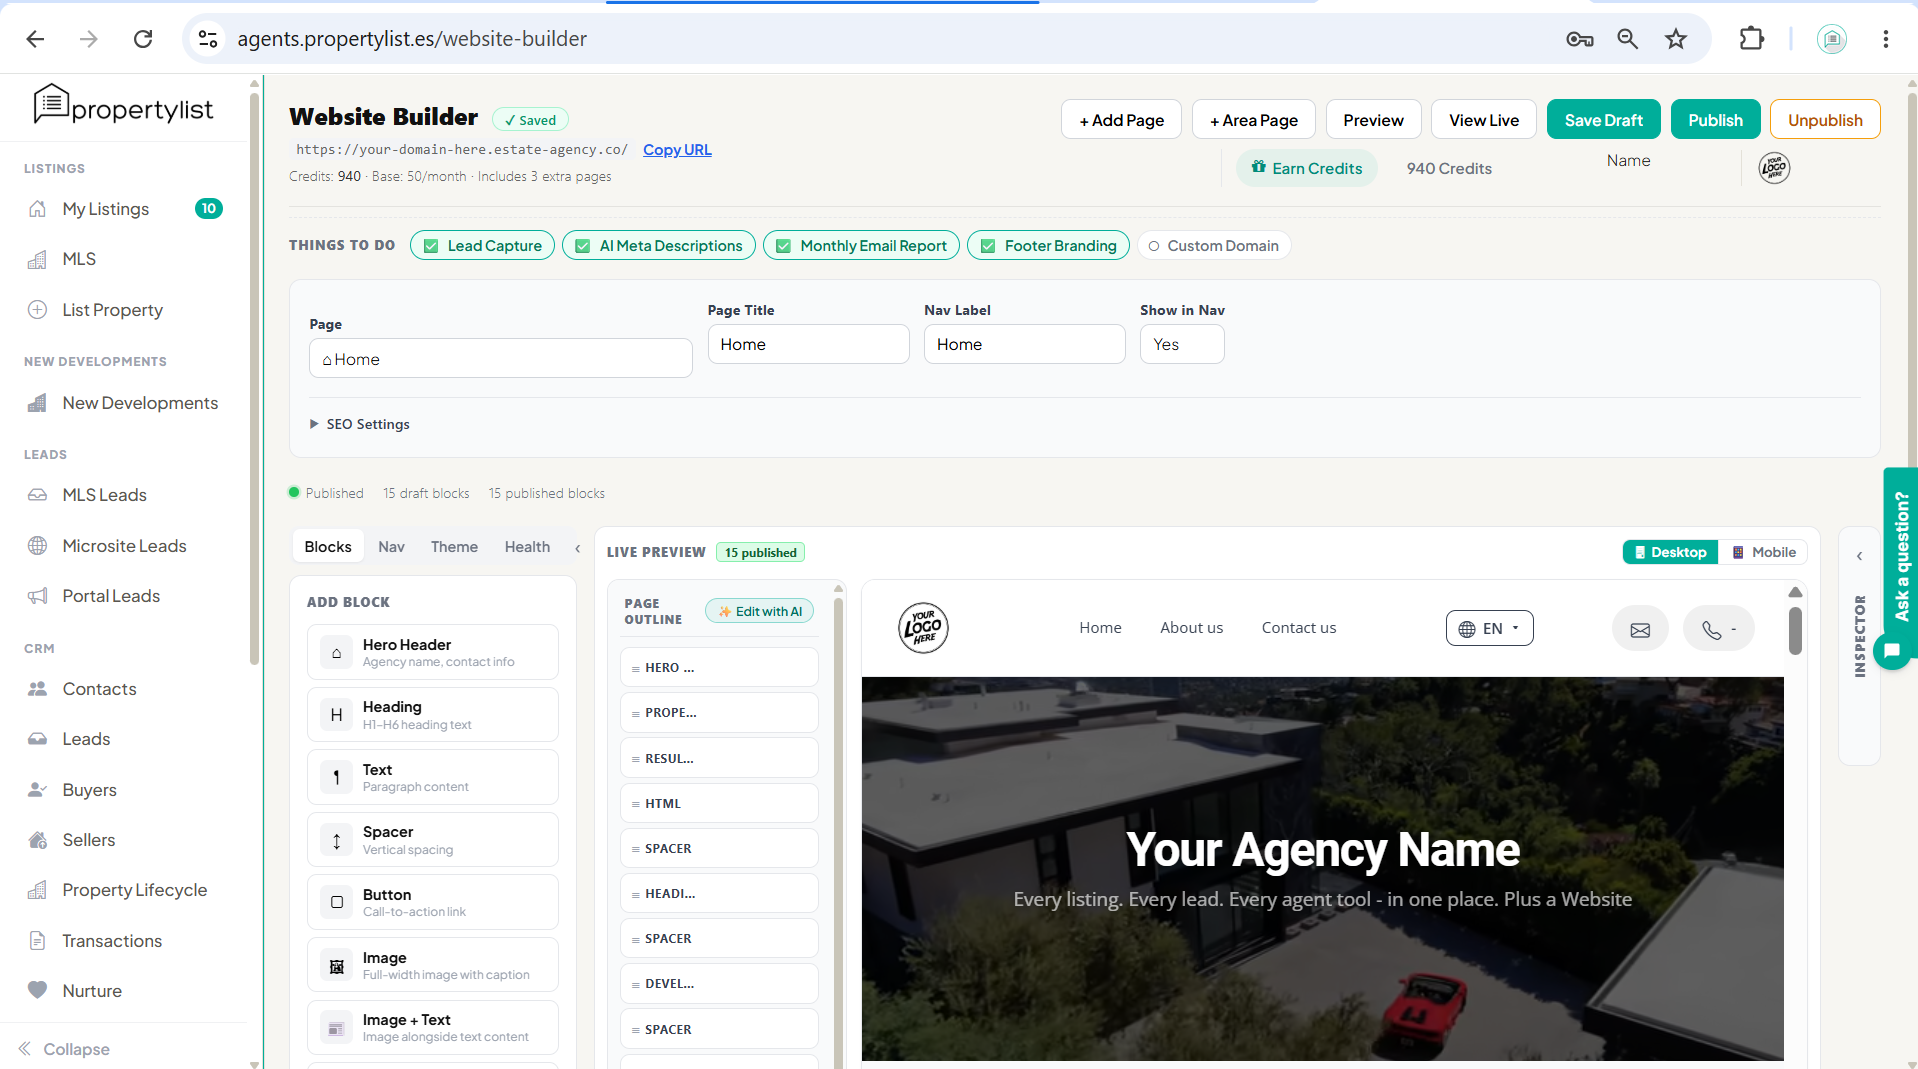
Open the Website Builder
Log in to your PropertyList agent account and open Website Builder from the left menu (under Agency). The first time you open it, a starter site is created for you using your agency name, logo and listings, so you always begin with a live site rather than a blank page. Your free web address is shown at the top left next to Copy URL; use View Live to open the published site in a new tab.
Pages and navigation
A new site starts with the pages most agencies need: Home, a Property Details page, plus About, Sales, Rentals and Contact. Add more from the toolbar at the top:
- + Add Page creates a standard page (a landing page, a service page, and so on).
- + Area Page creates a location page that automatically lists properties for a specific area (for example "Marbella Golden Mile"). Area pages are great for local SEO because each one targets a place buyers actually search for.
Pick the page you are editing from the Page dropdown. For each page you can set the Page Title (used in the browser tab and search results), the Nav Label (the short label in your menu), and Show in Nav (set to No for landing pages you link to directly). Expand SEO Settings to fine-tune how the page appears in search results.
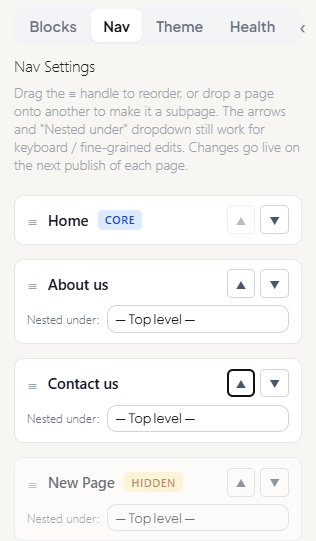
To arrange the menu itself, open the Nav tab. Drag the handle (the three lines) to reorder pages, or drop one page onto another to make it a subpage. Core pages always stay in the menu, while pages marked Hidden are still reachable by link but kept out of the menu. Nav changes go live on the next publish of each page.
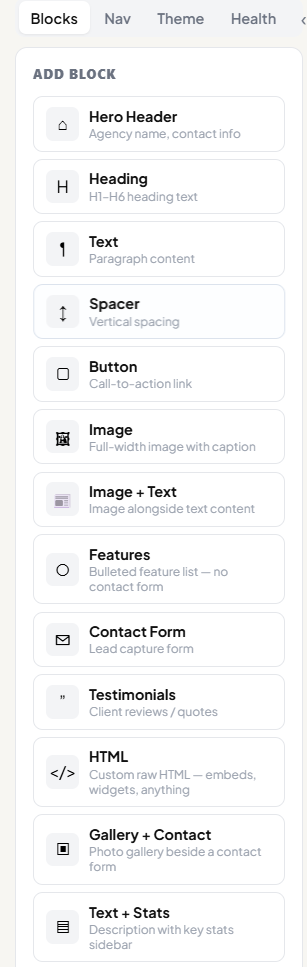
Build your page with blocks
Every page is made of blocks, self-contained sections you stack in any order. On the Blocks tab, click any block in the Add Block list to add it to the page. It appears in the Page Outline in the middle, and the live preview updates instantly.
| Block | What it is |
|---|---|
| Hero Header | Your headline banner with agency name, subtitle and contact buttons |
| Heading | A section title (H1 to H6) |
| Text | A paragraph of content |
| Spacer | Vertical breathing room between blocks |
| Button | A call-to-action link |
| Image | A full-width image with an optional caption |
| Image + Text | An image beside a block of text |
| Features | A bulleted list of selling points (no form) |
| Contact Form | A lead-capture form that feeds your CRM |
| Testimonials | Client reviews and quotes |
| HTML | Paste raw HTML to embed anything (maps, video, widgets) |
| Gallery + Contact | A photo gallery beside a contact form |
| Text + Stats | A description with a key-stats sidebar |
| Features + Contact | A features list beside a contact form |
| Property Search | The search and filter form for your listings |
| Results Grid | The grid of matching properties from your MLS |
| Developments | New-build developments listed directly by developers and promoters |
Arrange and manage blocks from the Page Outline. Select a block to reveal its inline controls (move up, move down, duplicate, remove) and to open its Inspector on the right, where you edit that block's content and settings.
Drafts vs published. The builder tracks changes as drafts so you can work in private. The header shows how many draft blocks and published blocks you have; nothing you change is visible to the public until you press Publish.
The Hero Header
The hero is the first thing visitors see. In its Inspector you can set a background image (recommended 1400x400px or wider), a background video URL (YouTube, Vimeo or a direct mp4/webm, played muted and looped), or a background colour. Leave the Heading empty to show your agency name automatically, add a Subtitle, choose the text alignment, and turn on Full-width section to let the hero stretch edge to edge (best with a wide photo or video).
Your listings: Property Search, Results Grid and Developments
Three blocks bring your live MLS data onto the site: Property Search (the filter form), Results Grid (the matching listings), and Developments (new-build projects listed directly by developers and promoters).
Every property imports automatically, and updates instantly. Each listing in your PropertyList account appears on your site with nothing to upload by hand - and the moment you add, edit, reprice or sell a property in the MLS, your site reflects it in real time. Because your site is built natively on PropertyList, there is no XML feed to set up and no sync schedule to wait for, so your website is never out of date.
Select the Property Search block to open its Inspector, where you control exactly what visitors see:
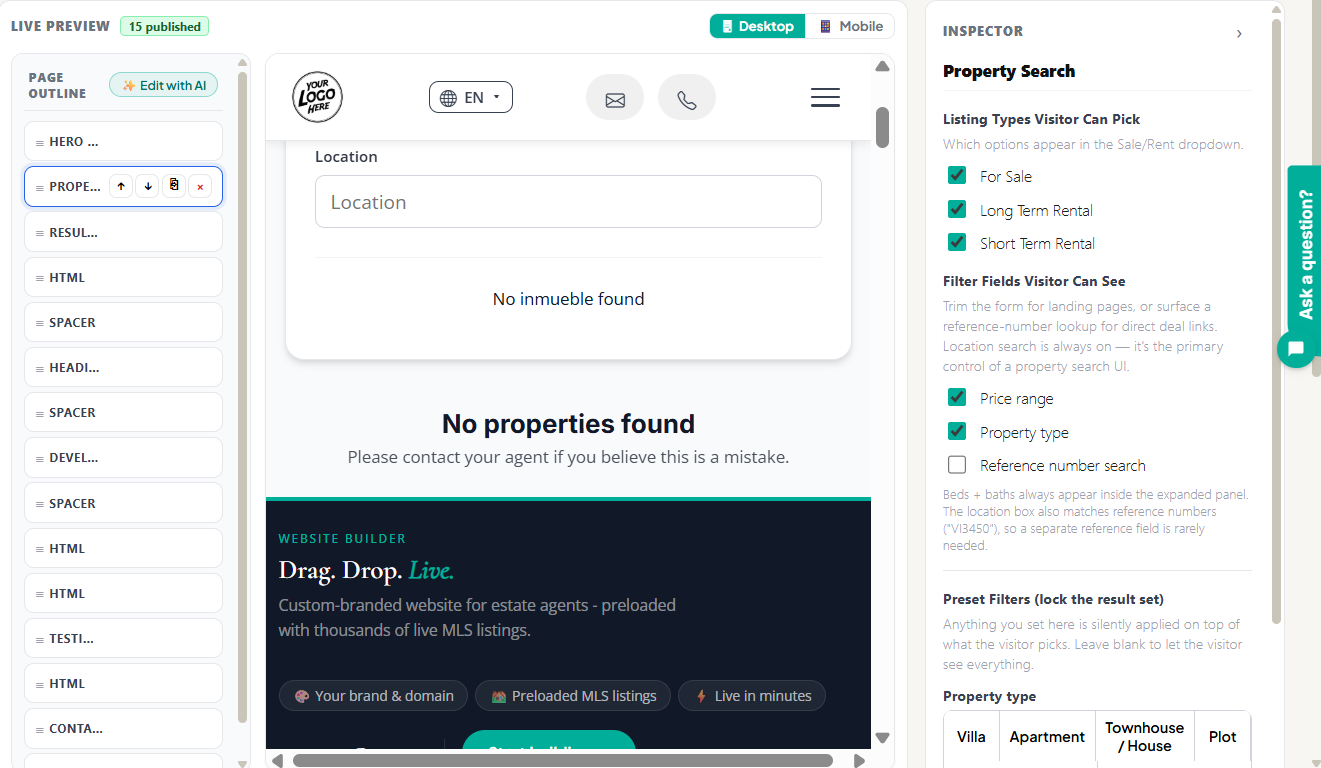
- Listing types visitors can pick - which options appear in the Sale/Rent dropdown: For Sale, Long Term Rental, Short Term Rental.
- Filter fields visitors can see - turn individual filters on or off (price range, property type, reference-number search). Location search is always on, and the location box also matches reference numbers such as "VI3450", so a separate reference field is rarely needed.
- Preset filters (lock the result set) - restrict which properties ever appear, so visitors only see a matching subset. Set a Listing Type, Property Types (Apartment, Penthouse, Villa, Country House, Townhouse, Plot), Locations, and a minimum or maximum price. Anything you preset is applied silently on top of whatever the visitor picks; leave it blank to show everything. This is the trick for focused landing pages, such as a "Marbella villas for sale" page that only ever shows that subset.
Style your site: themes, colours and navigation
Open the Theme tab to control the whole site's look:
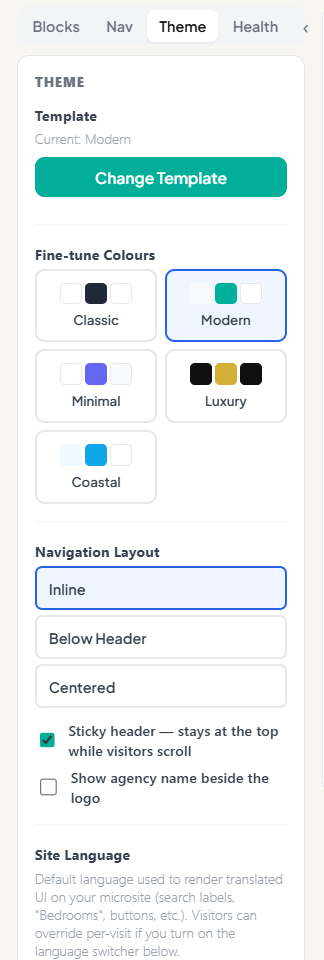
- Template - press Change Template to switch the overall layout and style.
- Fine-tune colours - pick a palette: Classic, Modern, Minimal, Luxury or Coastal.
- Navigation layout - Inline, Below Header or Centered, plus a sticky header that stays visible as visitors scroll and an option to show your agency name beside the logo.
- Site language - the default language used for translated UI labels (search labels, "Bedrooms", buttons), with an optional language switcher so visitors can override it.
Write faster with AI
Use Edit with AI (above the Page Outline) to draft or rewrite a whole page. Describe what you want in plain English, or pick one of the suggestions, and the builder updates the page content - and even the site colours or fonts if you ask. Changes are draft only, so nothing goes live until you publish.
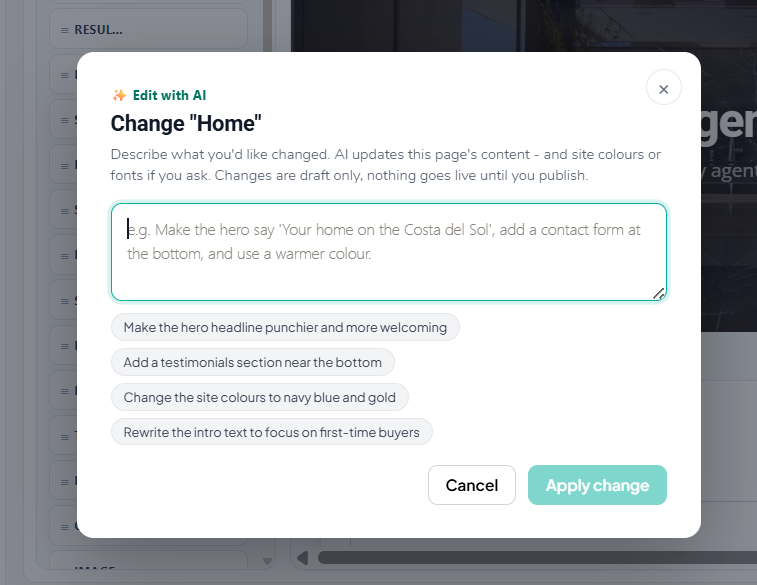
You can also switch on AI Meta Descriptions (see below) to add a Generate button in each page's SEO Settings, and AI Features to unlock the AI FAQ and AI Description blocks.
The Things to do checklist
The checklist at the top is a quick way to switch on the features that make a site perform. Click any item to manage it and see its cost in credits. Ticked items are already active:

- Lead Capture - adds a pop-up ("Looking for a property?") that captures visitors into your CRM. You choose the trigger (exit intent, a timed delay, or both), the delay, and the heading, subheading and button text. Around 8 credits/month.
- AI Meta Descriptions - adds a Generate button in each page's SEO Settings to write your search descriptions. Around 5 credits/month.
- AI Features (FAQ + Description) - unlocks the AI FAQ block and the AI Description block. Around 8 credits/month.
- Monthly Email Report - a performance summary emailed to your account on the 1st of each month. Around 5 credits/month.
- Footer Branding - removes the PropertyList branding from your footer. Around 50 credits/month.
- Custom Domain - connect your own domain (see below). Around 20 credits/month while connected.
Capture leads
Turn on Lead Capture in the checklist, and add a Contact Form (or a Gallery + Contact or Features + Contact block) to any page. Every enquiry submitted on your site - whether through the pop-up or a form - flows straight into your PropertyList CRM as a new lead, ready to assign, reply to and track, so nothing slips through the cracks.
Preview, publish and go live
- Preview your work, and use the Desktop / Mobile toggle above the live preview to check how the site looks on phones.
- Save Draft to save changes privately without affecting the live site.
- Publish to push your changes live. The status badge shows Published once it is done.
- View Live to open the public site in a new tab and confirm.
- Unpublish if you ever need to take the site offline again.
Connect a custom domain
Your site starts on a free .estate-agency.co address. To use your own domain (for example www.your-agency.com), tick Custom Domain in the Things to do checklist, enter your domain and press Connect, then follow the steps to point it at your site. Visitors then see your URL instead of ours. This runs at around 20 credits/month while connected, with the first month charged when you connect.
Credits and pages
Your plan includes a monthly base and an allowance of pages (for example, three extra pages on top of the essentials). Additional pages and the premium options above use credits. Your current balance is shown at the top of the builder, and Earn Credits shows ways to top up.
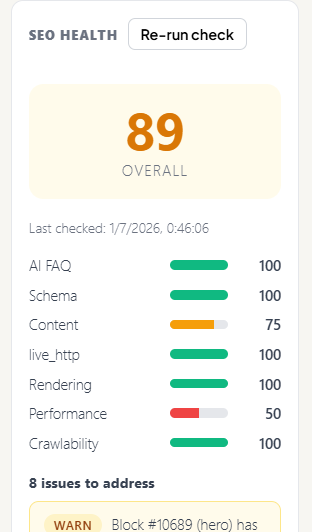
Check your site before you publish
Open the Health tab for an SEO health check. It gives an overall score and a breakdown across areas like AI FAQ, Schema, Content, live HTTP, Rendering, Performance and Crawlability, plus a list of specific issues to fix (for example a hero block with no content). Press Re-run check after making changes, and work the score up before you publish.
FAQ
Do I need to add my properties manually?
No. Every property in your PropertyList account imports automatically, with nothing to upload by hand. There is no XML feed to configure and no scheduled sync to wait for - your listings are simply there, and they stay current on their own.
How quickly do my listings update on the site?
Instantly. The moment you add a property, change a price, or mark one as sold in the MLS, your site reflects it in real time. Unlike a traditional XML feed, there is no import schedule and no wait - so your website is never showing stale prices or properties that are already gone.
Will my changes go live immediately?
Only when you press Publish. You can Save Draft as often as you like and the public site will not change until you publish.
Can I have more than one page?
Yes. Use + Add Page for standard pages and + Area Page for location pages. Extra pages beyond your plan's allowance use credits.
Where do enquiries go?
Every form or pop-up submission becomes a lead in your PropertyList CRM, where you can assign it, reply and track it.
Can I use my own web address?
Yes. Start on the free .estate-agency.co address and connect a custom domain whenever you are ready, via the Custom Domain item in the Things to do checklist.